
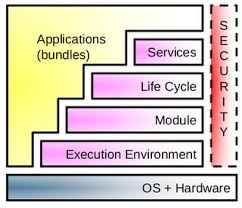
The OSGi framework is a great way to modularize your application and avoid disrupting already running pieces. OSGi allows you to start, stop, and update each module individually. Modules in OSGi are known as what we call “bundles”. A bundle is a collection of Java classes, configuration files, and other resources that delivers the outputted format to users, as well as providing additional services to other bundles.
Eclipse offers a great platform for developing OSGi bundles. Eclipse also includes an embedded OSGi Equinox container for running and testing your bundle within Eclipse. You will need Java installed on your computer. You can check this by running “java -version” from Command Line. If you don’t already, then you can install Java here.
Create Plug-in Project
Let’s now create an initial OSGi bundle that we will be running and debugging inside our Eclipse IDE.
- In Eclipse, click on File -> New -> Project.
- A new project dialogue will appear. Expand Plug-in Development and choose Plug-in Project and click Next.

- Enter these values then click Next:
- Project name – “hello.world.example”
- Source folder – “src/main/java”
- Output folder – “target/classes”
NOTE: Eclipse will create these folders since they do not yet exist.
- Target Platform – OSGi framework -> standard

- Uncheck the “Generate an activator” checkbox as we will use declarative services to manage our bundle.
- You can give any name you’d like but make sure the Java version in Execution Environment matches the Java version on your machine.
- Check your Java version by running “java -version” from Command Line.
- Click Finish.
Modify MANIFEST.MF
Your project will open to a MANIFEST.MF file. This is the file descriptor of your bundle. The Manifest file follows the formatting of a JAR file and defines your bundle name, version, execution environment, and all bundle dependencies.
Let’s start by clicking on the Dependencies tab of your Manifest file.
- Add “org.osgi.framework” to the Imported Packages section. This is for us to use the lifecycle hooks of OSGi.
- Add “org.slf4j” to log information to the OSGi running console. Save the file.

Create Java Class
- Create a new Java class by right-clicking on your project. Select New -> Class.
- Name your class “HelloWorld” and leave all other options the same.
- Next we will create our Component Definition class, but first let’s discuss what that is. 👇
OSGi is a framework for separately managing components’ dependencies and services. This creates a well-defined environment that minimizes runtime failures and enables productivity for developers. But as dependencies become more complex for your bundles you can run into trouble dynamically updating certain components. OSGi can “wire” bundles together at resolution time and the framework will not allow them to be “unwired” during the running lifetime of each bundle.
To avoid this, OSGi services allow us to dynamically update bundles by introducing dependency injection to bundles at runtime. This form of dependency injection is known as “Declarative Services”, which is a form of Extender Pattern and uses an XML configuration file to create resources. The configuration XML defines your bundles properties, dependencies, and registered services. This allows OSGi Declarative Services to instantiate your Java class, register its provided services, and activate your component automatically. So now let’s create our component XML that will act as our Service Runtime Component (SCR).
Create Component Definition
- Right-click on your project and select New -> Folder and give it the name “OSGI-INF”.
- Right-click on the new “OSGI-INF” folder and select New -> Other. Expand Plug-in Development and select Component Definition. Click Next.
- Leave the name as “component.xml” but we have to register our SCR to our main Java class.
- Click the Browse… button in the Class field. Select your “hello.world.example.HelloWorld” class.
NOTE: You can easily find your class by beginning to type “hello” in the search bar. - Copy the full name of your class to the Name field. Click Finish.

- Open your “component.xml” in the OSGI-INF folder and click on the Source tab.
You can see the opening tag line looks something like:
<scr:component xmlns:scr="http://www.osgi.org/xmlns/scr/v1.1.0" This defines our component definition XML as our bundle’s Service Component Runtime. Here, we define the three lifecycle callback events of our bundle: activate, deactivate, modified.
- activate is called as soon as all services are bound in the bundle.
- deactivate is called right before bundle termination.
- modified is called when any configuration component is updated.
We can choose to name these three lifecycle hooks any name we choose, but we must define that using our SCR. From the Source tab in our component.xml file, modify to match the below code snippet:
<?xml version="1.0" encoding="UTF-8"?>
<scr:component xmlns:scr="http://www.osgi.org/xmlns/scr/v1.1.0"
		activate="activate"
		configuration-policy="optional"
		deactivate="deactivate"
		enabled="true"
		immediate="true"
		modified="modified"
		name="hello.world.example.HelloWorld">

   <implementation class="hello.world.example.HelloWorld"/>
</scr:component>
We see the three lifecycle hooks defined along with:
- enabled=”true”
- immediate=”true”
- configuration-policy=”optional”
The important thing to note is that the name of the component definition MUST match the name of its implementation Java class. This is to properly call the implemented methods in our HelloWorld.java class.
Update Java Class
Now, we return to the HelloWorld.java class and add in implementations of the three lifecycle hooks we defined in our SCR. You will have errors. Click on Source -> Organize Imports to add all necessary imports. Match the below snippet to update your Java class and log to the OSGi console that will run inside Eclipse:
package hello.world.example;

public class HelloWorld {

	public void activate() {
		System.out.println("Hello World starting...");
		System.out.println("Hello World started!");
	}

	public void deactivate() {
		System.out.println("Hello World stopping...");
		System.out.println("Hello World stopped!");
	}

	public void modified() {
		System.out.println("Hello World updating...");
		System.out.println("Hello World updated!");
	}
}
Running The OSGi Console
Now it’s time to run our bundle inside Eclipse and run OSGi commands to test our bundle and view the output.
- Right-click on the project and select Run as -> Run Configurations.
- A dialogue will open and select OSGi Framework.
- We only want to run necessary bundles so click Deselect All and then check the hello.world.example bundle.
- Add only the necessary bundles by then clicking Add Required Bundles.
- Click Apply and then click Run.
You may see exceptions in the OSGi console but after the framework launches, click inside the console window and hit <ENTER>. You should see osgi> appear. Now you can use OSGi commands to command your bundle and also view other running bundles. A list of useful OSGi commands can be found here. Let’s first list all running bundles by entering: ss. You will see a massive list of all the currently active bundles. We want to find ours easily so enter: ss hello to view our hello.world.example running bundle.
Starting/Stopping Our Bundle
We can also start and stop our bundle to view the logs from our implemented Java class. Below our useful commands to run so we can view the state of our bundle:
osgi> ss hello
"Framework is launched."

id	State       Bundle
859	ACTIVE      hello.world.example_1.0.0.qualifier
osgi> stop 859
Hello World stopping...
Hello World stopped!
osgi> start 859
Hello World starting...
Hello World started!
osgi>
We use the bundle ID to command out bundle to start and stop. We start bundles with the simple start <bundle_id> command, and stop with the stop <bundle_id> command. And it’s that simple!
Adding/Removing/Updating Bundles
Another powerful tool of the OSGi console is the ability to add, remove, and update bundles to the running console. We uninstall bundles by using their bundle ID.
osgi> ss hello
"Framework is launched."

id	State       Bundle
859	ACTIVE      hello.world.example_1.0.0.qualifier
osgi> uninstall 859
Hello World stopping...
Hello World stopped!
osgi>
osgi> ss hello
"Framework is launched."

id	State       Bundle
osgi>
To install a local bundle, we need first export our plug-in project as a properly formatted object. We will export our bundle as a JAR file.
- Right-click on the project and select Export.
- A dialogue opens and select Plug-in Development -> Deployable plug-ins and fragments and click Next.
- Make sure Directory is selected and choose the location of your choice.
- Return to your running OSGi console and enter install file:///<path_to_bundle/jarfile>.
- Below you can see an example of how to install a bundle from your local environment, see that it successfully installed, and start your freshly install bundle:
osgi> install file:///"<path_to_bundle>/hello.world.example_1.0.0.202006102155.jar"
Bundle id is 1057
Bundle                1057|Installed  |    1|hello.world.example (1.0.0.202006102155)
BundleContext        null
BundleId             1057
SymbolicName         hello.world.example
Headers               Automatic-Module-Name = hello.world.example
 Bundle-ActivationPolicy = lazy
 Bundle-ManifestVersion = 2
 Bundle-Name = Hello World Example
 Bundle-RequiredExecutionEnvironment = JavaSE-1.8
 Bundle-SymbolicName = hello.world.example
 Bundle-Version = 1.0.0.202006102155
 Import-Package = org.osgi.framework;version="1.8.0"
 Manifest-Version = 1.0
 Service-Component = OSGI-INF/component.xml

LastModified         1591840868294
RegisteredServices   null
ServicesInUse        null
Module               osgi.identity; osgi.identity="hello.world.example"; type="osgi.bundle"; version:Version="1.0.0.202006102155" [id=1057]
Location             file:////Users/thomas.fitzgerald/eclipse_workspaces/testing_workspace/plugins/hello.world.example_1.0.0.202006102155.jar
State                2
Version              1.0.0.202006102155

osgi> ss hello
"Framework is launched."

id	State       Bundle
1057	INSTALLED   hello.world.example_1.0.0.202006102155
osgi> start 1057
Hello World starting...
Hello World started!
osgi> ss hello
"Framework is launched."

id	State       Bundle
1057	ACTIVE      hello.world.example_1.0.0.202006102155
osgi>
Extend The Console With Custom Commands
We can even extend the functionality of the OSGi console and run custom-made commands. We need to extend the CommandProviderInterface in order to have a handle to extending console commands. Another necessity is that each console command must begin with “_” in order to be recognized by OSGi. All “_xxx” methods will be available in the OSGi console for use. Let’s add two methods:
- _whoami
- _uname
Now follow the below steps to implement the Command Provider Interface and fill in the method stubs:
- Return to your MANIFEST.MF file.
- Use the Dependency tab to add “org.eclipse.osgi.framework.console” to your list of dependencies.
- Implement CommandProvider in your Java class header.
- Add all unimplemented methods (only the getHelp() method).
- Add your _whoami() and _uname() methods.
We will be using the BundleContext provider as arguments for our activate() and modified() methods since we will need to extract information from it. We also need to use the CommandInterpreter element as a parameter for our OSGi console extender methods. Modify your Java source code to resemble below:
package hello.world.example;

import org.eclipse.osgi.framework.console.CommandInterpreter;
import org.eclipse.osgi.framework.console.CommandProvider;
import org.osgi.framework.BundleContext;
import org.osgi.framework.Constants;

public class HelloWorld implements CommandProvider {
	private BundleContext bundleContext;

	public void activate(BundleContext bundleContext) {
		System.out.println("Hello World starting...");
		bundleContext.registerService(CommandProvider.class.getName(), this, null);
		this.bundleContext = bundleContext;
		System.out.println("Hello World started!");
	}

	public void deactivate(BundleContext bundleContext) {
		System.out.println("Hello World stopping...");
		this.bundleContext = null;
		System.out.println("Hello World stopped!");
	}

	public void modified(BundleContext bundleContext) {
		System.out.println("Hello World updating...");
		this.bundleContext = bundleContext;
		System.out.println("Hello World updated!");
	}

	@Override
	public String getHelp() {
		return "\tuname() prints system information\nwhoami() prints bundle and class name\n";
	}

	public void _whoami(CommandInterpreter ci) {
		String bundleName = this.bundleContext.getBundle().getSymbolicName();
		String className = this.getClass().getSimpleName();
		ci.print("Hello, my bundle is: " + bundleName + ":" + className);
	}

	public void _uname(CommandInterpreter ci) {
		String vendorName = this.bundleContext.getProperty(Constants.FRAMEWORK_VENDOR);
		String fwVersion = this.bundleContext.getProperty(Constants.FRAMEWORK_VERSION);
		String osName = this.bundleContext.getProperty(Constants.FRAMEWORK_OS_NAME);
		String osVersion = this.bundleContext.getProperty(Constants.FRAMEWORK_OS_VERSION);

		System.out.println(vendorName + " " + fwVersion
				+ " " + osName + " " + osVersion);
	}
}
Make sure that you register the CommandProvider service or else you will not be able use its OSGi console services. Now save your Java class and let’s run the OSGi Framework again. Here, Equinox is starting from the -console parameter in your run arguments and the CommandProvider Service is being provided as the framework is initiated. The console accepts your new commands and checks with the CommandProvider Service to perform the added actions. Pretty cool!!
Now, you can try to use your new commands and see them output to the console. Below is the output of the commands that I ran. If you had any trouble running these commands then comment below 👇 and I can try to help you figure it out.
osgi>
osgi> uname
Eclipse 1.8.0 MacOSX 10.15.5
osgi> whoami
Hello, my bundle is: hello.world.example:HelloWorldosgi>
osgi> help
---Extension Registry Commands---
	ns [-v] [name] - display extension points in the namespace; add -v to display extensions
	pt [-v] uniqueExtensionPointId - display the extension point and extensions; add -v to display config elements

	uname() prints system information
	whoami() prints bundle and class name
Thanks again for following and I hope you had fun doing this! Please stay tuned for taking OSGi to the server side and working with remote systems. Cheers! 🍻